


When that happens, there are two options you can explore. First, you can upgrade the build platform into something more generous. However, not all 3D printers are open to that kind of upgrade, especially the fully enclosed ones. Not to mention, that method takes a lot of work since you can’t just simply pop in a larger build plate you bought at an online store. The second option is more straightforward: just buy a large 3D printer.
But the problem with the latter is that there are a lot of options out on the market. They range from expensive high-end 3D printers to cheap Chinese products that offer excellent long-term value. The Ultimaker 3 Extended and the BCN3D Sigmax are examples of the former while the Tevo Tornado and the Creality CR-10S are examples of the latter.
In this guide, we’ll point you in the direction of the best large 3D printers that you can buy today. Most of the products listed here are not recommended as starter 3D printers, though. Some are too expensive while others require a significant amount of tinkering during the initial setup.
| Product | Layer Thickness | Max Build Size | Filament Diameter | Supported Materials | Connectivity | Weight |
| Tronxy X5S | 100 microns | 13 x 13 x 15.8 in | 1.75 mm | PLA, ABS, Wood, Nylon, and more | USB, SD card | 28.7 lb |
| Tevo Tornado | 50 microns | 11.8 x 11.8 x 15.8 in | 1.75 mm | PLA, ABS, Wood, Flexible, and more | USB, SD card | 30.9 lb |
| Creality CR-10S | 100 microns | 11.8 x 11.8 x 15.8 in | 1.75 mm | PLA, ABS, TPU, PETG, and more | USB, SD card | 28.6 lb |
| Maker Farm Pegasus 12” | 50 microns | 11.5 x 12 x 13.5 in | 1.75 mm | PLA, ABS, HIPS, Nylon, and more | USB, SD card | 30 lb |
| Xinkebot Orca2 Cygnus | 50 microns | 15.7 x 15.7 x 18.8 in | 1.75 mm | PLA, ABS, PVA, PETG, and more | USB, SD card | 50 lb |
| LulzBot TAZ 6 | 50 microns | 11 x 11 x 9.8 in | 3 mm | PLA, ABS, Nylon, HIPS, and more | USB, SD card | 33 lb |
| Zortrax M300 | 90 microns | 11.8 x 11.8 x 11.8 in | 1.75 mm | PLA, ABS, HIPS, PETG, and more | USB, SD card | 59.5 lb |
| Raise3D N2 Plus | 10 microns | 12 x 12 x 24 in | 1.75 mm | PLA, ABS, PETG, TPU, and more | Wi-Fi, USB, SD card | 143.3 lb |
| BCN3D Sigmax | 50 microns | 16.5 x 11.7 x 8.3 in | 2.85 mm | PLA, ABS, Nylon, TPU, and more | USB, SD card | 39.7 lb |
| Ultimaker 3 Extended | 20 microns | 8.5 x 8.5 x 11.8 in | 2.85 mm | PLA, ABS, PVA, Nylon, and more | Wi-Fi, USB | 24.9 lb |
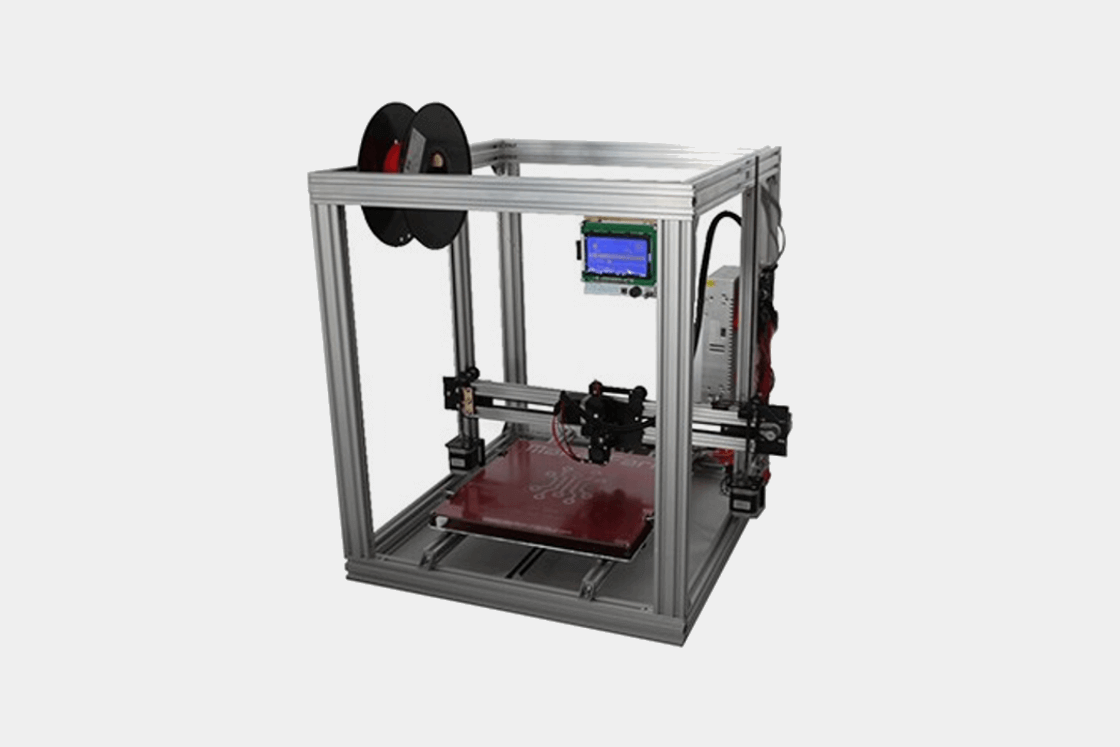
 Tronxy X5S
Being a DIY kit, the X5S needs to be assembled from scratch. It takes around six to 10 hours to get the entire thing set up, though the process could have been a lot easier if the instruction manual was more detailed. Then again, that’s a common issue among Chinese 3D printers.
The X5S has a sturdy aluminum frame, making it a lot more stable than plastic-framed 3D printers – a stable frame is crucial when printing large objects. This budget 3D printer comes with a heated print bed and an LCD interface. The heated print bed makes it possible to print with high-temperature materials. However, the X5S, in its default setup, is not equipped to deal with such a scenario.
In order to get the most out of the X5S, you need to commit to making upgrades in several areas. For example, the extruder the X5S comes with needs to be replaced with something more suited to deal with high temperatures.
Again, the X5S is a tinkerer’s machine, so make sure you understand what you’re going to get before you reach for your wallet. But if you’re willing to put in the effort and spend money on some upgrades, the X5S can be a very capable 3D printer that brings excellent long-term value.
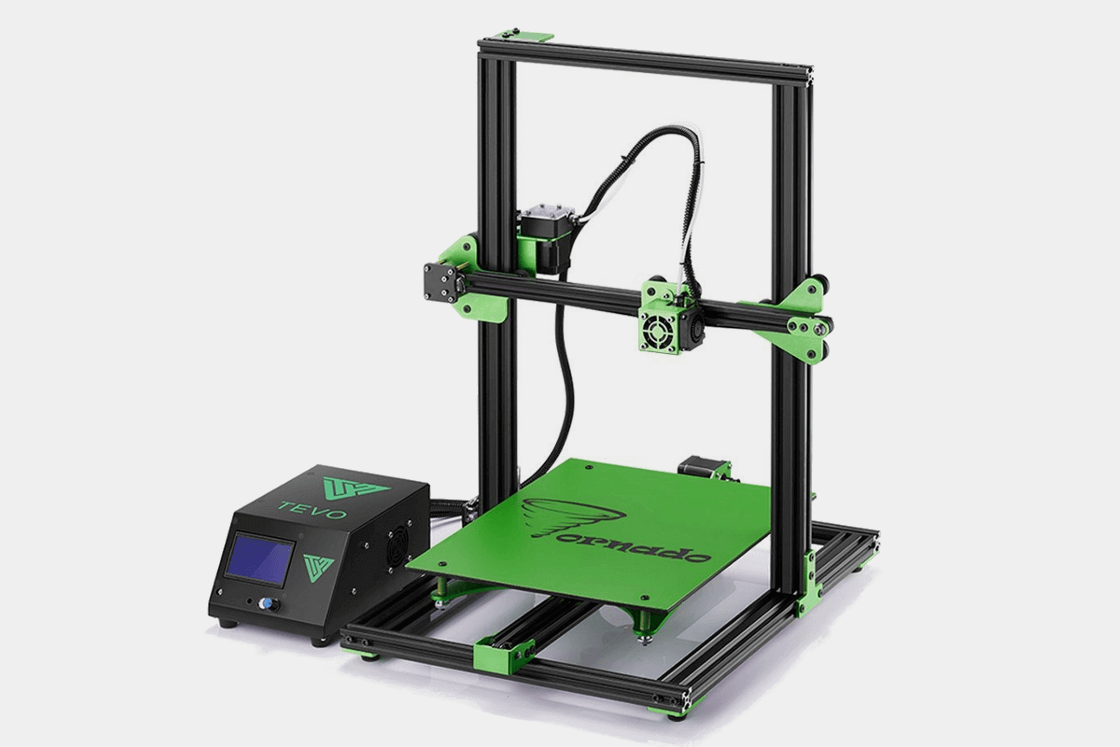 Tevo Tornado
The Tornado is available in two packages: a DIY kit and a pre-assembled package. If you want to learn the ins and outs of 3D printers on a more intimate level, go for the DIY kit. But if you don’t want to deal with the assembly, which can take at least six hours, and just want to start printing as soon as possible, pick up the pre-assembled package. The difference in price between the two isn’t that big – both are still under $500.
An open-framed 3D printer, the Tornado has an almost all-metal construction, one of the main reasons consumers are sometimes torn between it and the more popular Creality CR-10S. It has a heated print bed and comes with a separate control box, which, sadly, has really loud fans. The print bed heats up fast, so the wait time before each print is minimal.
If you want a cheaper alternative to the CR-10S, the Tornado is one of the best options. It doesn’t have the same features as the former – such as a filament sensor and a power panic – but it gets the job done. But as mentioned, it needs upgrades, and not just in one or two areas.
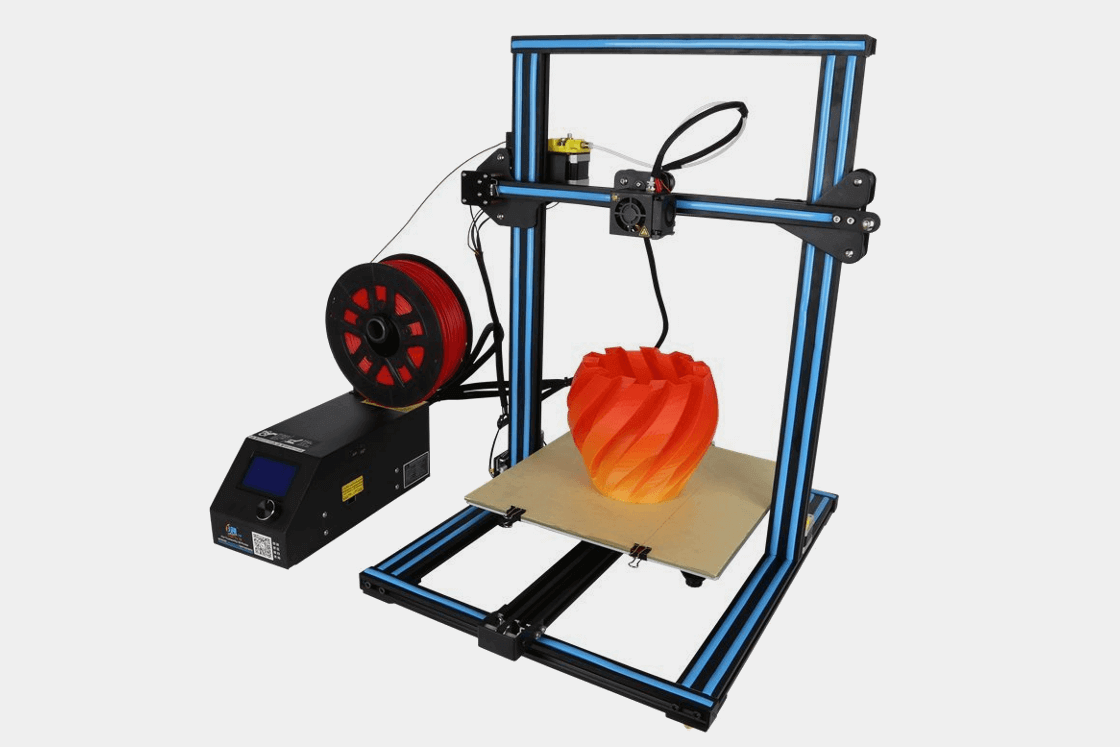 Creality CR-10S
This cheap 3D printer is ideal for both beginners and intermediate users. It rolls out in a semi-assembled package, with the initial setup taking only around 30 minutes to one hour, and that includes the print bed calibration. The CR-10S has no onboard controls. Instead, it comes with a separate control box that includes an LCD interface and a couple of ports for the USB and the SD card.
With the right configurations, the CR-10S can produce gorgeous prints. In its default setup, the CR-10S is limited. In order to unlock its full potential and get it to print more than just PLA, a fair amount of modifications are needed, starting with an extruder more suited for high-temperature performance. The print bed could use an immediate upgrade as well.
It’s a good thing the CR-10S comes with a large online community. This makes upgrading the CR-10S less of a daunting task, especially for beginners. There are a lot of people on user groups who’d be more than happy to point you in the right direction and share tips on how you can get the most out of the CR-10S.
In all, the CR-10S is a reliable 3D printer that offers outstanding long-term value. It has a rigid aluminum frame that keeps it stable during large-scale print jobs and can print non-stop for days with minimal issues once tuned-up.
 Maker Farm Pegasus 12”
The Pegasus comes in three sizes, with the 12-inch version being the largest of the trio. Maker Farm offers different configurations for the Pegasus, including a dual extruder option. Out of the box, the 12-inch Pegasus is equipped with an LCD interface for onboard controls and offline printing. This is not the case with the 8-inch and 10-inch versions.
Similar to the Original Prusa i3 MK3 kit, the undisputed DIY champion, the Pegasus is easy to assemble. The entire initial setup takes about six to eight hours, maybe 10 hours at max for beginners. While not perfect, the included instruction manual is easy to follow, making the assembly a straightforward process. In case you need technical help, Maker Farm has excellent customer service, with company president Colin Farrer leading the charge.
Even though the assembly is relatively painless, the Pegasus still needs a fair amount of tinkering before it can produce the best results. But once dialed-in, it can go up against high-end 3D printers, producing the kind of results that make all that initial tinkering worth it.
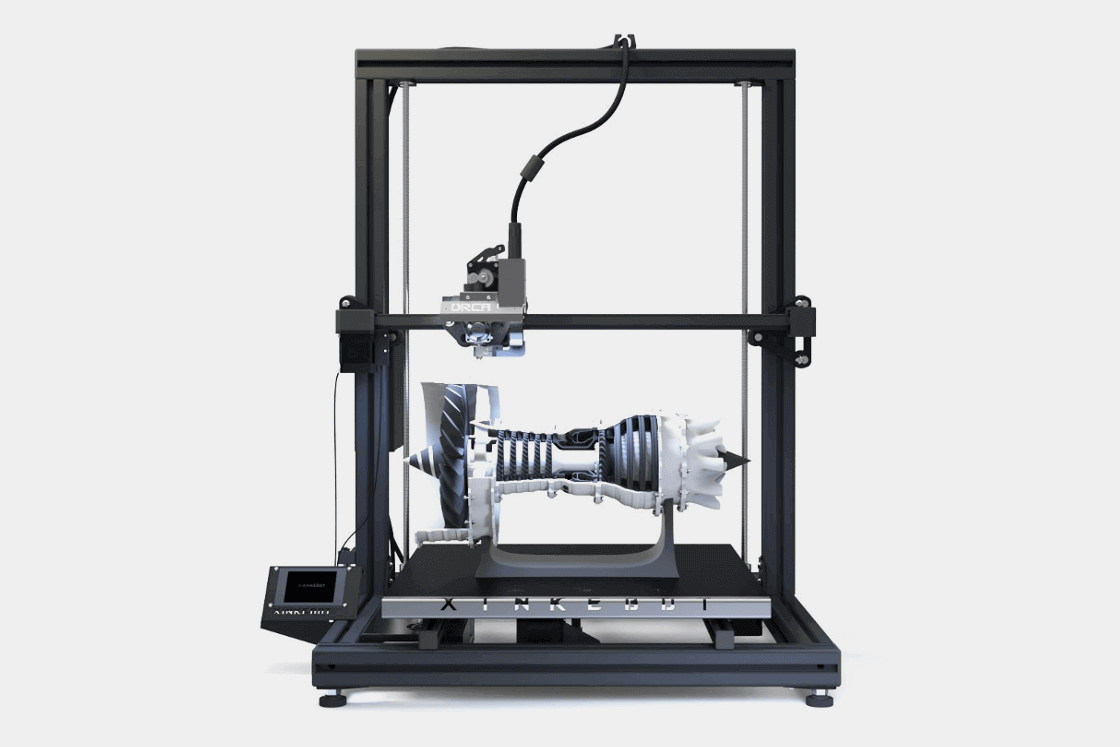 Xinkebot Orca2 Cygnus
The Orca2 Cygnus comes in an easy-to-assemble package. This is the biggest improvement from the original Orca model, which proved to be too difficult for beginners to put together. Since the Orca2 Cygnus comes in a semi-assembled package, the initial setup is a lot more straightforward, although the instruction manual is still far from perfect.
Unlike the CR-10S, the Orca2 Cygnus has a dual extruder setup right out of the box and has automatic bed leveling for a painless bed calibration process. It’s also equipped with a touchscreen interface, located right next to the print bed, and has better cable management. In addition, the Orca2 Cygnus is a more capable 3D printer in its default setup than the CR-10S.
But there’s a steep price for all of those improvements: the Orca2 Cygnus is three times more expensive than the CR-10S. And as mentioned, it has a small community, so it can be difficult to find solutions to some of the problems you will encounter down the line. These are the downsides you must be willing to accept if you want to get the Orca2 Cygnus.
Concerning print quality, the Orca2 Cygnus is on the same level as the CR-10S. With the right settings, it can produce smooth and incredibly detailed 3D models in a consistent manner. So, in short, everything comes down to whether or not you’re willing to cough up more money for those above-mentioned improvements.
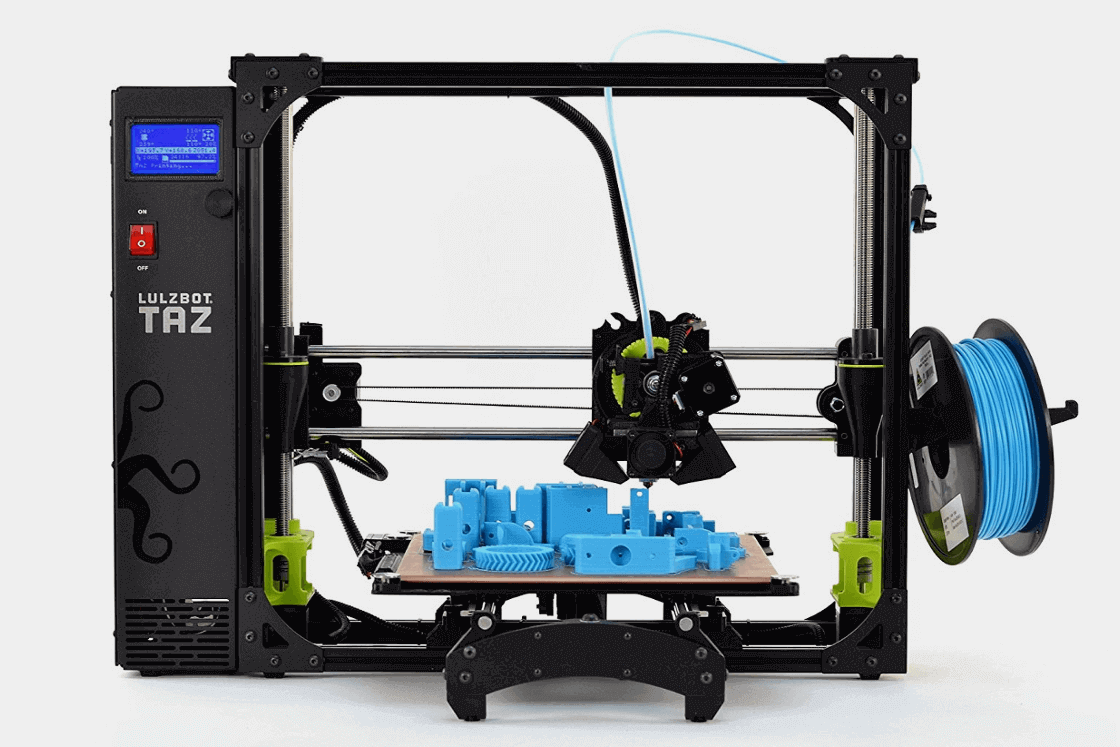 LulzBot TAZ 6
The TAZ 6 is mostly assembled out of the box, with most of the critical parts already secured in place. The print bed calibration is easy and the software installation is straightforward – the default software is a custom Cura. It takes less than one hour to set up the TAZ 6, and the chief reason for that is the comprehensive instruction manual included in the package.
In its default settings, the TAZ 6 can produce good results. But with the proper tune-up, it can create highly detailed and ridiculously smooth 3D models with ease. In addition, the TAZ 6 can print with different materials, including high-temperature ones such as ABS. There are materials that may require some form of enclosure, though.
An open source 3D printer, the TAZ 6 is one of the best 3D printers on the market. It’s easy to use and doesn’t need a lot of maintenance after each completed print. It has the versatility to deal with all sorts of materials and the stability to handle high-speed prints.
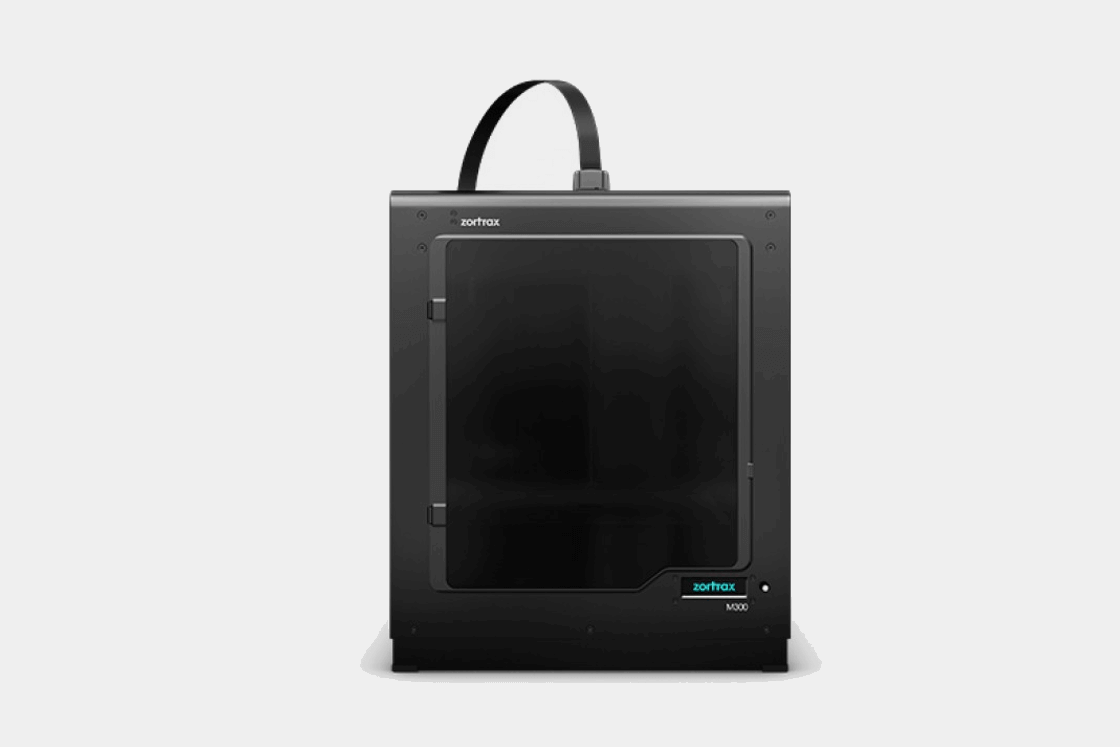 Zortrax M300
The M300 is housed in a robust frame and has a heated print bed. Since it comes with a full enclosure, the M300 is a lot better at regulating temperature than open-framed 3D printers, which leads to better results when printing with high-temperature materials.
In the past, the M300 was limited to Zortrax proprietary filaments, which are more expensive than third-party filaments, not to mention the color options are limited. That’s no longer the case today. The M300 is now compatible with third-party filaments, although Zortrax filaments still tend to produce the best results since the M300 is optimized for its first-party filaments.
The M300, however, is not a recommended 3D printer for casuals or beginners, and the chief reason for that is the price tag. This is an expensive 3D printer designed for professional use, similar to the Ultimaker 3.
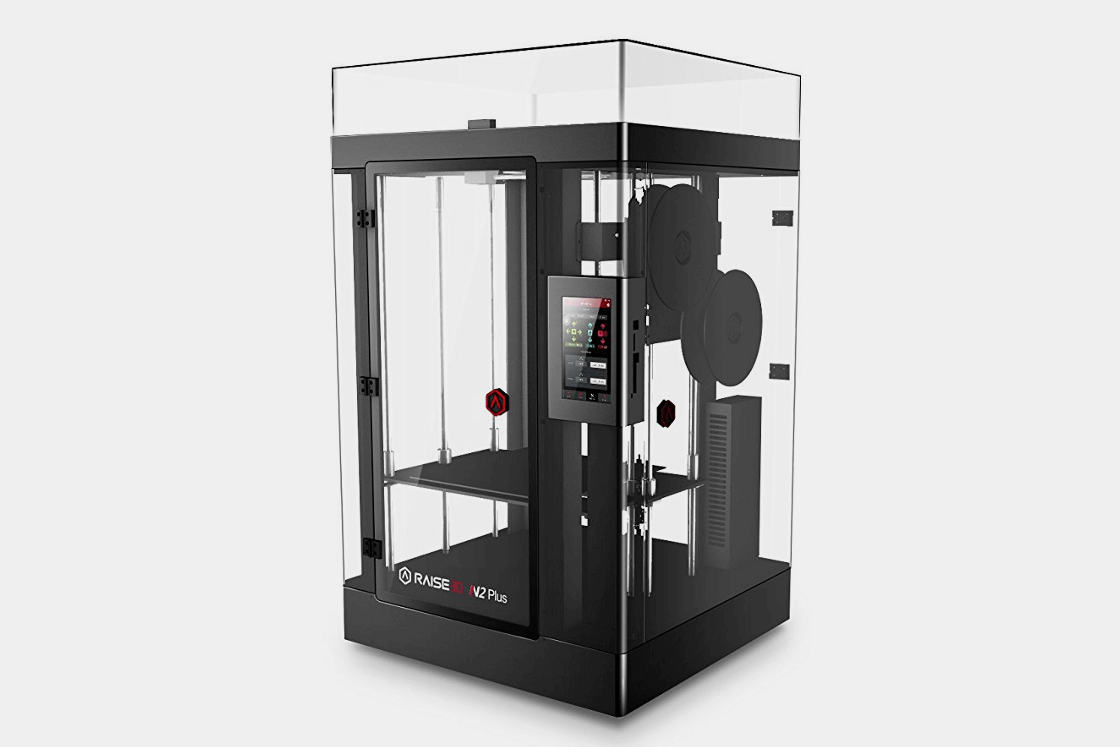 Raise3D N2 Plus
The N2 Plus is the upsized version of the N2. It’s available in both single extruder and dual extruder configurations, with the latter obviously being the more expensive option. If you’re willing to break the bank for this 3D printer, you might as well go all-in and get the dual extruder setup.
This massive 3D printer is mostly assembled out of the box, with only a few parts that need to be popped into place. The initial setup is straightforward and doesn’t involve a lot of tinkering on both the hardware side and the software side. With this 3D printer, you can go from unboxing to printing in just one hour.
It’s easy to forget about the other things the N2 Plus brings to the table – its physical dimensions get all the spotlight. With a maximum resolution of 10 microns, the N2 Plus is capable of producing extremely detailed 3D models. It’s also surprisingly quiet compared to other large 3D printers. No doubt the fully enclosed setup plays a big part in that.
The N2 Plus is not for everyone. It’s best suited for 3D printing enthusiasts and professionals who absolutely need that 24-inch vertical space. For casuals, the N2 is the more practical option.
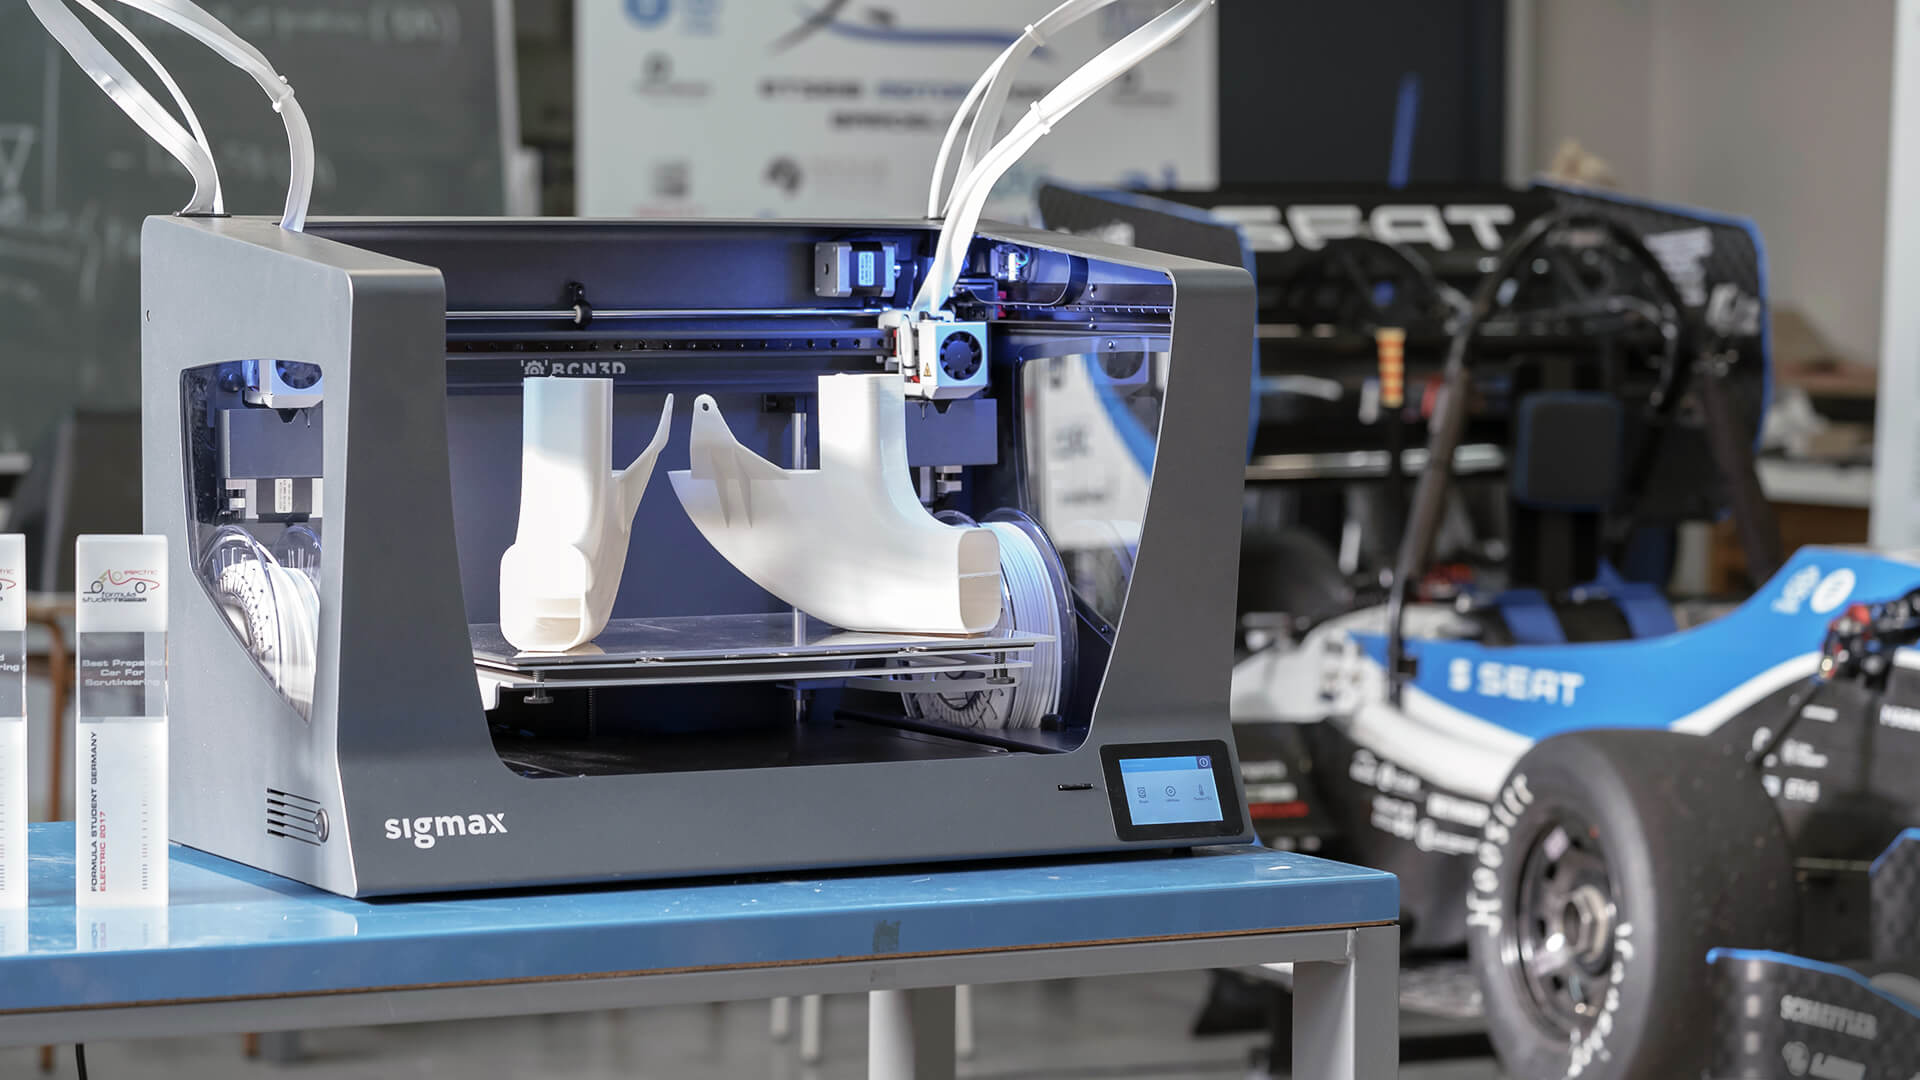
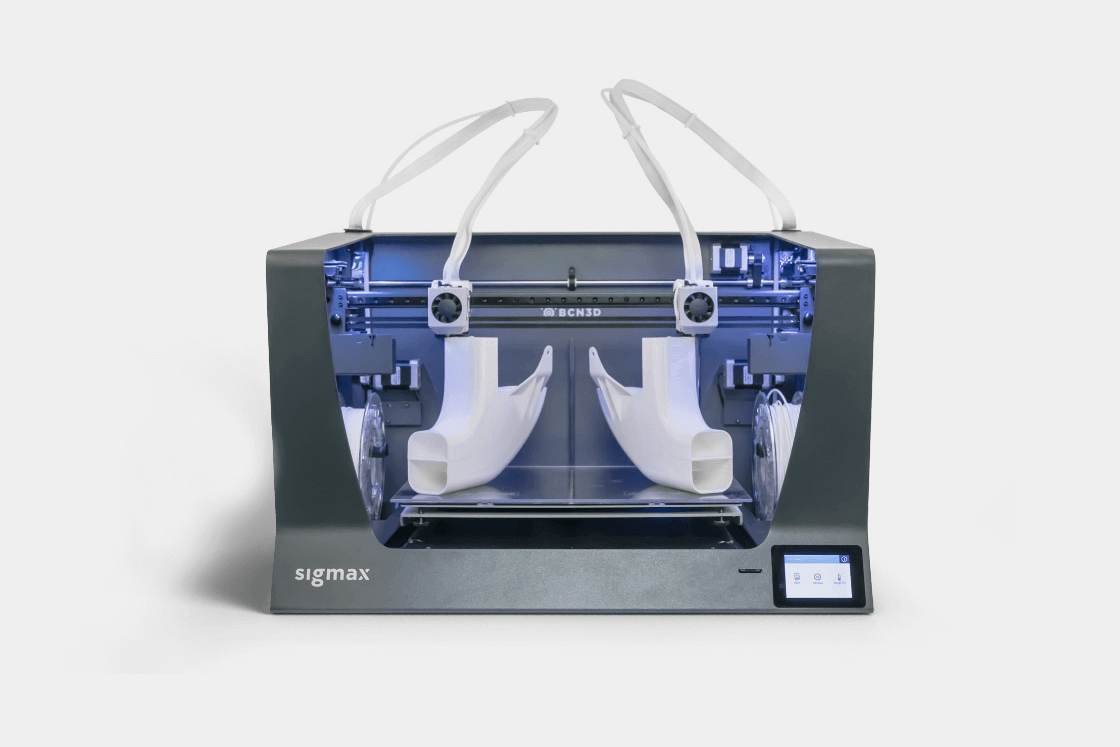 BCN3D Sigmax
This high-end 3D printer is fully assembled out of the box, with all the moving parts secured in place and ready to go as soon as the settings are configured. It has a touchscreen interface for direct control and comes with a user-friendly software with lots of options. The design of the Sigmax is clean and professional. There are no loose wires popping out in a messy way. Everything is well-secured inside the metal frame, including the spool holders on either side of the print bed.
The Sigmax’s independent dual extruder setup makes it unique on this list. The dual extruders are housed in separate print heads and can move independently from each other. Combined with the Sigmax’s massive build platform, the dual extruders can print two objects at the same time, and that translates to more productivity. In addition, the dual extruder setup makes it possible to print with two colors.
The Sigmax was designed with professionals and hardcore enthusiasts in mind. It’s an open source 3D printer that offers a lot of room for experimentation, courtesy of that independent dual extruder system. In case you need an enclosure – either for high-temperature performance or simply for protection – BCN3D also offers an enclosure add-on for the Sigmax.
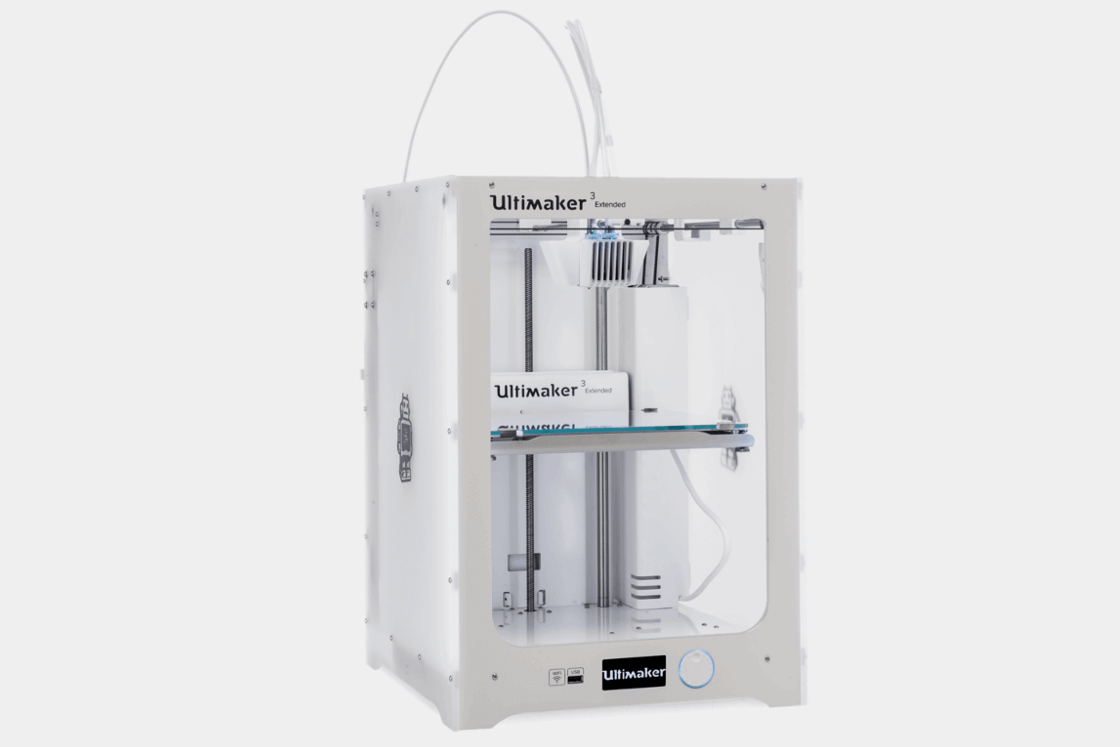 Ultimaker 3 Extended
Manufactured by a Dutch company, the Ultimaker 3 Extended is housed in a sturdy metal frame that includes an LCD interface and a USB port out front – the latter replaces the SD card slot found on the original Ultimaker 2. It can connect via Wi-Fi and has an onboard camera for remote monitoring.
The most notable change between the Ultimaker 2 and the Ultimaker 3 series is the number of extruders. The Ultimaker 3 Extended comes with a dual extruder setup in a single print head. This setup allows you to print with two colors as well as print soluble supports for more complex 3D models. But since the print head now carries a heavier load, the Ultimaker 3 Extended is significantly slower than the Ultimaker 2.
The Ultimaker 3 Extended is known for its accuracy and precision. Even in low settings, it can produce detailed prints. When running with optimum settings, the Ultimaker 3 Extended crushes most of the competition. It can also print with different materials in a consistent manner, although as other users have pointed out, it needs an enclosure for high-temperature performance.
Just like the BCN3D Sigmax, the Ultimaker 3 Extended is going to put a large hole in your wallet, but you definitely get what you pay for. This high-end 3D printer is recommended for professionals, designers, educators, and hardcore enthusiasts.